Photography Basics
13 min. read
Exposure
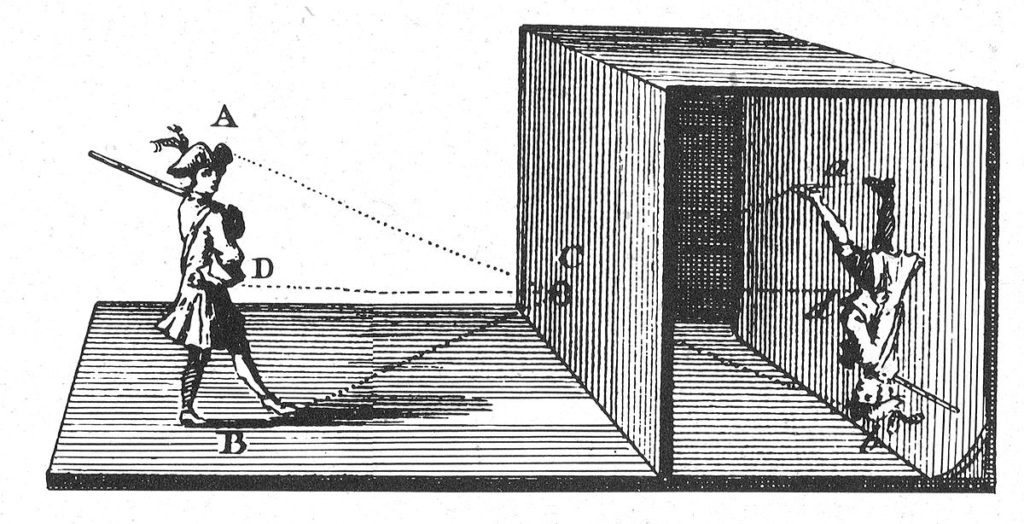
The First Camera
At some point many years ago people realised that if you allowed light through a small slit like a latch in a door an image of the world beyond the slit would be projected onto a wall behind it. Known as camera obscura, they are the first examples of the technology on record, exploiting the behaviour of light diffraction to produce the visual.
Modern cameras exploit a very similar technique, just with a few extra bells and whistles.
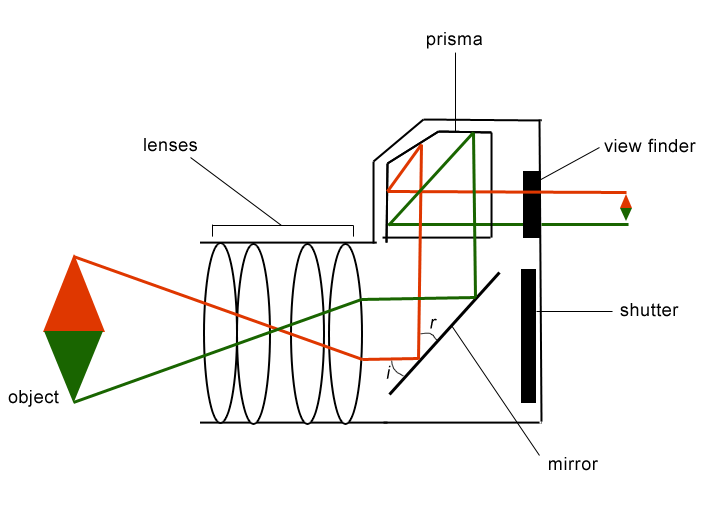
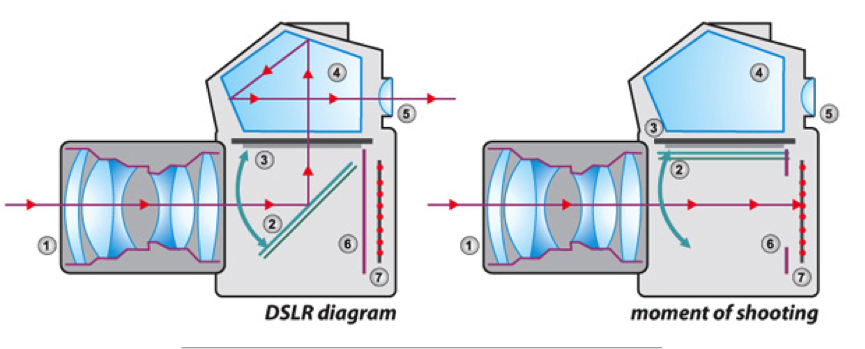
Incoming light passes through the lens (slit) before being projected into the viewfinder by a series of mirrors. The shutter (more on this later) pulls out of the way upon snapping the picture to expose the recording medium behind it (e.g. film or digital sensor) to the image.
By altering the properties of the lens, the shutter speed and the recording medium, the full gamut of photographic varieties (portrait, landscape, etc.) can be accomplished.
Types of Cameras
For someone like me just starting out in photography, I think it is important to have a clear understanding of the differences between DSLR and mirrorless cameras. Not only can this knowledge help you to decide which type of camera is the best choice for you and your needs, but it can also provide you with a better understanding of the basics of photography. Here, I'll discuss the main differences between a DSLR and a mirrorless camera and the benefits of each.
A DSLR camera typically has a larger body than a mirrorless camera, and it has a viewfinder that allows you to see the scene you are shooting. This is one of the main advantages of using a DSLR camera, since you can see the exact image you will be capturing before you take the shot. On the other hand, a mirrorless camera does not have a viewfinder and instead relies on an electronic screen or viewfinder to show you what you are shooting. Although this may seem like a disadvantage, some photographers prefer the digital viewfinder of a mirrorless camera as it can provide a more accurate image of the scene.
In addition, DSLR cameras typically have more manual controls and a wider variety of lenses and accessories than mirrorless cameras. This makes them a good choice for experienced photographers who want more control over their shots. Mirrorless cameras, on the other hand, are often more lightweight and compact, making them easier to carry and transport. They also tend to be more affordable than DSLR cameras, making them a great choice for beginners who are just starting out.
For context, I am currently using a Canon EOS M50 Mark II, a mirrorless camera with an APS-C sensor (a slightly cropped i.e. non-full frame).
Balancing Exposure
There are three variables one can control (more or less) on the camera at any point in time to produce a high quality shot: aperture, shutter speed and iso. The combination of the three combines together to determine the exposure of the shot, namely whether too much light is coming in (overexposed) leading to blown-out whites, or not enough light is coming in (underexposed), leading to really dim shots.
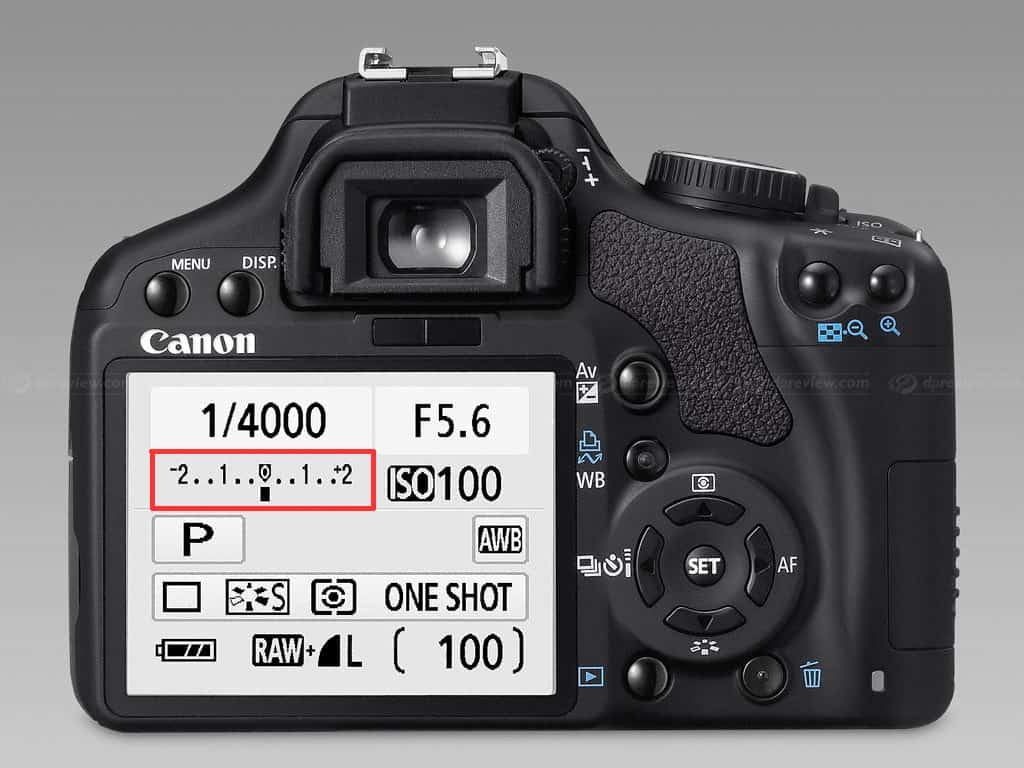
As you alter any of the above variables, modern cameras will give you a reading of whether the shot is properly exposed, known as the exposure meter (shown above). By adjusting one variable in lockstep with another, perfect exposure can be maintained. Most cameras also have Auto mode which will perfectly expose the shot every time. The drawback is you lose creative control of the shot which leads to suboptimal results generally speaking.
The Three Variables of Photography
Aperture
Aperture refers to the opening of the lens diaphragm, which controls the amount of light that reaches the imaging sensor. Aperture is measured in f-stop numbers, such as f/2.8, f/4, or f/8. A large aperture (small f-stop number) allows more light to reach the sensor, while a small aperture (large f-stop number) allows less light to reach the sensor.
Changing the aperture alters the focal point of the shot. A large aperture (small f-stop) will have a really narrow depth of field, meaning objects at different distances to the lens than the focus will be blurred. This obviously makes it a great choice for portrait photography. Consider the following two photographs:
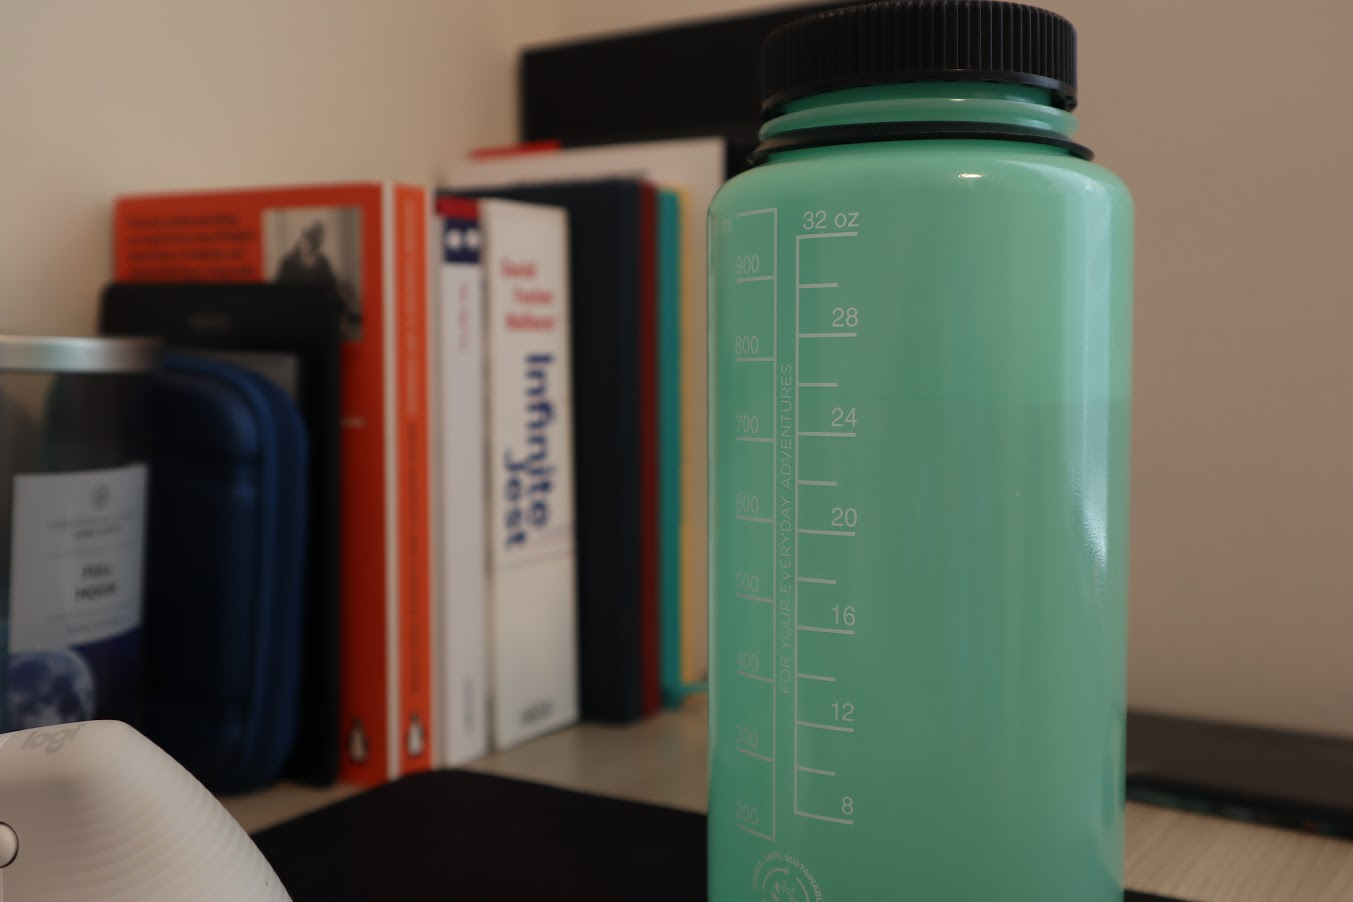
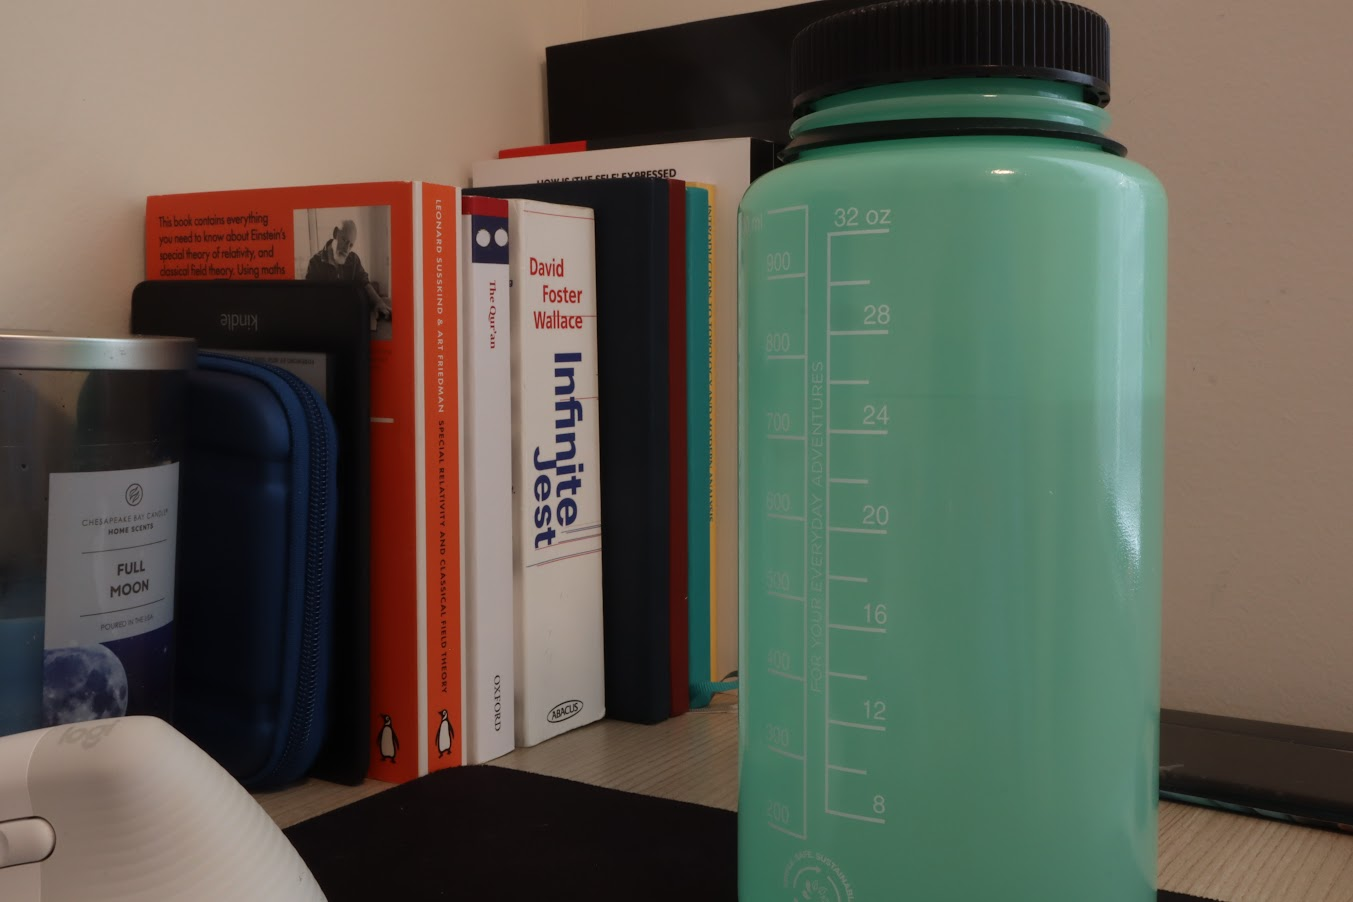
The first one was shot with f4 (1/6s shutter speed, ISO100). The second was shot with f29 (1.3s shutter speed, ISO500). Notice how the text on the books in the background is blurred in the first, owing to the larger aperture. This table summarises the general use cases for different apertures:
| f-stop | Usage |
|---|---|
| f1.4-f4 | Ideal for portraits, product shots |
| f5.6-f11 | Ideal for general photography |
| f16-f22 | Ideal for landscapes, cityscapes and group shots. Note that the smaller aperture will often require really slow shutter speeds so using a tripod is generally a must. |
Shutter Speeds
Shutter speed is the length of time that the shutter is open and light is allowed to reach the imaging sensor. Shutter speed is measured in fractions of a second, such as 1/250 or 1/30. A fast shutter speed allows less light to reach the sensor, while a slow shutter speed allows more light to reach the sensor.
| Shutter speed | Usage |
|---|---|
| 1/500 to 1/8000s | For capturing a moment in time. Best to use continuous shot mode when using such fast shutter speeds |
| 1/4 to 1/400s | 1/4 to 1/400s |
| 1/2s and slower | For capturing the passing of time, will likely require an ND filter for extremely long exposures in daylight. Really needs a tripod to assist. |
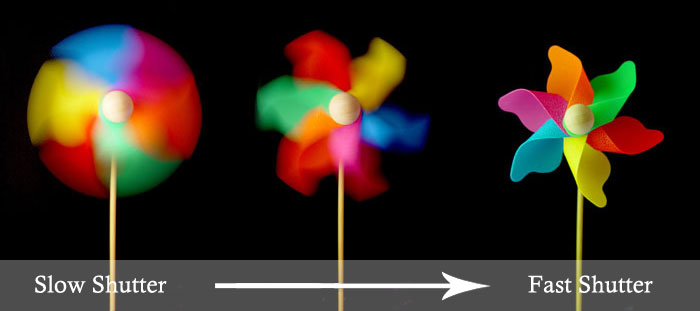
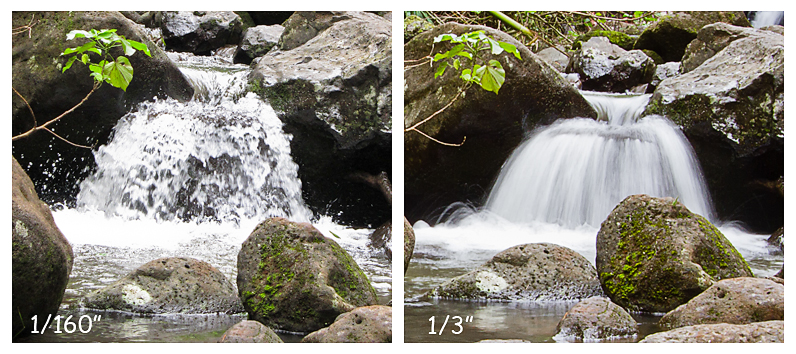
A common thought is that one should always use as fast a shutter speed as possible to achieve the best looking image. After all, who wants a blurred photo? However, slow shutter speeds can be used really creatively to achieve some awesome in-camera effects, like this misty river.
ISO
ISO is a measure of the sensitivity of the camera’s imaging sensor to light. A low ISO (100-400) is best for bright conditions, while a high ISO (1600-3200) is best for low-light conditions. Higher ISOs will produce more digital noise in the image, so it is important to use the lowest ISO possible for the best image quality.
In general, you want to set the ISO as low as possible to correctly expose the shot as higher ISO values can introduce digital noise into the shot, especially if there are large regions of the same colour. It is solely used to set the exposure of the shot and cannot be used in a creative fashion (as a general rule) in the same way that aperture and shutter speed can be.
Putting It All Together
So you want to take a really sick photo? What are the basic steps (ignoring composition of course here)?
What has worked well for me to this point is considering what the defining quality of the shot is from a physical perspective. Am I shooting someone else in which case a portrait would be good? Is it a sports shot? A wide landscape? And so on. Using the above principles, you can then begin to get a sense of whether it is the aperture or shutter speed that you are going to want to control.
Camera Modes
Most cameras have the following five modes:
- Auto (A) - the camera sets all three elements (aperture, shutter speed and ISO) automatically
- Manual (M) - the user sets all three elements manually
- Aperture priority (Av) - the user sets the aperture and the camera will automatically set the shutter speed and ISO for correct exposure
- Shutter priority (Tv) - the user sets the shutter speed and the camera will automatically set the aperture and ISO for correct exposure
- Program (P) -you can make adjustments to any of the three elements and the camera will do its better to correctly expose the photo accordingly
Which mode to use then? As a general rule, what I would say so far is that Auto is great if you have very limited time to get the shot setup. The camera is smart enough to do a pretty good job from the context you provide it. I haven't used Program at all really, and Manual is only ideal when you have a heap of time to go in and fine-tune the three elements, like for a professional shoot. In everyday shooting, I find myself using Aperture and Shutter Priority the most, selecting the one depending on what I am manipulating to produce the desired effect. Portraits? Go aperture priority. Sports shot? Go shutter priority.
By focusing on only one element (aperture or shutter speed) there is way less mental overhead to get the right exposure. However, it is worthwhile noting how to combine the three should you wish to use the manual or program modes.
- Increasing the aperture lets in more light so should be accompanied by a faster shutter speed or a lower ISO value.
- Making the shutter faster lets in less light and so should be accompanied by a larger aperture or a higher ISO value.
There is a lot more to get into with respect to particular settings and configuration of the camera to achieve great shots, but the past few weeks I've found these few points to be most enlightening in starting to take some shots that I actually like the look of.
More coming soon...